Sunday, 19 August 2018
SNOMED & Neo4j
https://github.com/rorydavidson/SNOMED-CT-Database/tree/master/NEO4J
1. Install Neo4J
2. Make sure of installation python version 3.6.x
3. make sure of installation py2neo version 3.1.2: pip install py2neo==3.1.2
4. Download RF2 Full version of SnomedCT
5. In case of International version, ignore language option
running a script from the git. for ex (:
python snomed_g_graphdb_build_tools.py db_build --action create --rf2 C:/Users/ngo010/PWorks/NEO4J/20180731/Full --release_type full --neopw Khongco2016 --output_dir C:/Users/ngo010/PWorks/NEO4J/build
After import RF2 into Neo4J, can connect to the graph database by py2neo:
>>> from py2neo import Graph
>>> graph = Graph("bolt://localhost:7687")
>>> graph.evaluate("MATCH (a:ObjectConcept) RETURN count(a)")
>>> graph.run("MATCH (a:ObjectConcept) RETURN a.id, a.FSN LIMIT 3").data()
>>> from pandas import DataFrame
>>> DataFrame(graph.run("MATCH (a:ObjectConcept) RETURN a.id, a.FSN LIMIT 3").data())
Tuesday, 21 February 2017
MongoDB for Ubuntu 16.04
https://www.howtoforge.com/tutorial/install-mongodb-on-ubuntu-16.04/
Now update the systemd service with command below:

Now type exit to exit from MongoDB shell.
Reload the systemd service:
////////////////////////////////////////////
access to mongodb
$ mongo -u admin -p admin123 --authenticationDatabase admin
create database
> use mydb
upload json file
$ mongoimport -u admin -p admin123 --authenticationDatabse admin -db mydb --collection [colectionname] [path_to_json_file]
Prerequisites
- Ubuntu Server 16.04 - 64 bit
- Root privileges
- Install MongoDB
- Configure MongoDB
- Conclusion
Install MongoDB on Ubuntu 16.04
Step 1 - Importing the Public Key
GPG keys of the software distributor are required by the Ubuntu package manager apt (Advanced Package Tool) to ensure package consistency and authenticity. Run this command to import MongoDB keys to your server.
sudo apt-key adv --keyserver hkp://keyserver.ubuntu.com:80 --recv EA312927
Step 2 - Create source list file MongoDB
Create a MongoDB list file in /etc/apt/sources.list.d/ with this command:
echo "deb http://repo.mongodb.org/apt/ubuntu
"$(lsb_release -sc)"/mongodb-org/3.2 multiverse" | sudo tee
/etc/apt/sources.list.d/mongodb-org-3.2.list
Step 3 - Update the repository
update the repository with the apt command:
sudo apt-get update
Step 4 - Install MongoDB
Now you can install MongoDB by typing this command:
sudo apt-get install -y mongodb-org
We have to create a new mongodb systemd service file in the
'/lib/systemd/system' directory. Go to that directory and create the new
mongodb service file 'mongod.service' with vim.
cd /lib/systemd/system/
vim mongod.service
Paste script below:vim mongod.service
[Unit]
Description=High-performance, schema-free document-oriented database
After=network.target
Documentation=https://docs.mongodb.org/manual

[Service]
User=mongodb
Group=mongodb
ExecStart=/usr/bin/mongod --quiet --config /etc/mongod.conf

[Install]
WantedBy=multi-user.target
Save the file and exit.
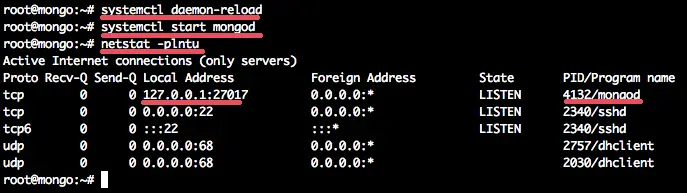
Now update the systemd service with command below:
systemctl daemon-reload
Start mongodb and add it as service to be started at boot time:
systemctl start mongod
systemctl enable mongod
Now check that mongodb has been started on port 27017 with the netstat command.systemctl enable mongod
netstat -plntu
Configure MongoDB username and password
When the MongoDB packages are installed you can configure username and password for the database server:Step 1 - Open mongo shell
Before you set up a username and password for MongoDB, you need to open the mongodb shell on your server. You can login by typing:
mongo
If you get error Failed global initialization: BadValue Invalid or no user locale set. Please ensure LANG and/or LC_* environment variables are set correctly, try the command:
export LC_ALL=C
mongo
mongo
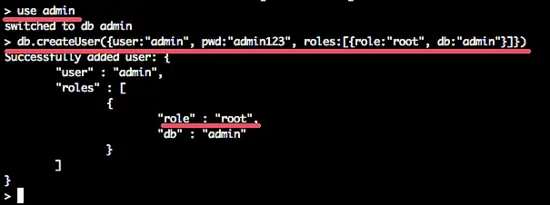
Step 2 - Switch to the database admin
Once you`re in the MongoDB shell, switch to the database named admin:
use admin
Step 3 - Create the root user
Create the root user with this command :
db.createUser({user:"admin", pwd:"admin123", roles:[{role:"root", db:"admin"}]})
Desc: Create user admin with password admin123 and have the permission/role as root and the database is admin.
Now type exit to exit from MongoDB shell.
Step 4 - Enable mongodb authentication
Edit the mongodb service file '/lib/systemd/system/mongod.service' with your editor.
vim /lib/systemd/system/mongod.service
On the 'ExecStart' line 9, add the new option '--auth'.
ExecStart=/usr/bin/mongod --quiet --auth --config /etc/mongod.conf
Save and exit.Reload the systemd service:
systemd daemon-reload
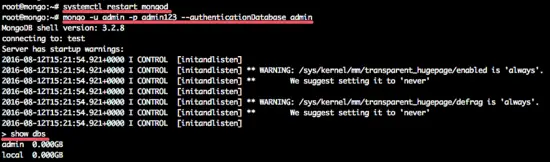
Step 5 - Restart MongoDB and try to connect
Now restart MongoDB and connect with the user created.
sudo service mongod restart
and connect to the mongodb shell with this command:
mongo -u admin -p admin123 --authenticationDatabase admin
and you will see the output like this: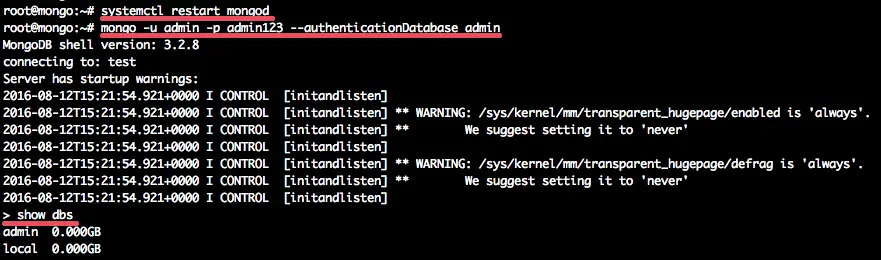
Conclusion
A well-known NoSQL database that offers high performance, high availability, and automatic scaling is MongoDB. It is different from the RDBMS such as MySQL, PostgreSQL, and SQLite as it does not use SQL to set and retrieve data. MongoDB stores data in `documents` called BSON (binary representation of JSON with additional types of information). MongoDB is only available for 64-bit Long Term Support Ubuntu Release.////////////////////////////////////////////
access to mongodb
$ mongo -u admin -p admin123 --authenticationDatabase admin
create database
> use mydb
upload json file
$ mongoimport -u admin -p admin123 --authenticationDatabse admin -db mydb --collection [colectionname] [path_to_json_file]
Thursday, 15 December 2016
Java & Play Framework
1. Install Oracle IDK (latest version -- 1.8.0_122)
2. download Play with Activator (last version -- Activator 1.3.12 including Play 2.5.10)
https://www.playframework.com/download
3. download Scala IDE (last version 4.5.0) - The bundle contains the lastest release version of the Scala IDE for Eclipse and it comes pre-configured for optimal performance
http://scala-ide.org/download/sdk.html
4. Setting Play by add the following into PATH
- activator-dist-1.3.12\bin
5. Setting JAVA_HOME
- Java\jdk1.8.0_112\bin
6. Setting sbteclipse : https://github.com/typesafehub/sbteclipse
- add global file (for version 0.13 and up) at ~/.sbt/0.13/plugins/plugins.sbt
- content: addSbtPlugin("com.typesafe.sbteclipse" % "sbteclipse-plugin" % "5.0.1")
7. Go to user worksapce (ex. PlayWorkspace), the create new project
- [...]$ activator new
- [...]$ select play_java
- [...]$ type name of project, ex. DemoPlayJava
- [...]$ cd DemoPlayJava
- [...]$ activator ui (for using web browser to manage the project)
- [...]$ create eclipse project by: activator clean compile eclipse
Now can opem ScalaIDE and import the DemoPlayJava project without any error like:
https://github.com/scala-ide/scala-ide-play2/issues/215
Read book: Play for Java cover 2
Monday, 3 October 2016
Fast download tools for ubuntu
https://aria2.github.io/
aria2 is a lightweight multi-protocol & multi-source command-line download utility. It supports HTTP/HTTPS, FTP, SFTP, BitTorrent and Metalink. aria2 can be manipulated via built-in JSON-RPC and XML-RPC interfaces.
$ sudo apt-get install aria2
Usage Examples
Command-line scares you off? No, aria2 is really easy to use!!
Download from WEB:
$ aria2c http://example.org/mylinux.iso
Download from 2 sources:
$ aria2c http://a/f.iso ftp://b/f.iso
Download using 2 connections per host:
$ aria2c -x2 http://a/f.iso
BitTorrent:
$ aria2c http://example.org/mylinux.torrent
BitTorrent Magnet URI:
$ aria2c 'magnet:?xt=urn:btih:248D0A1CD08284299DE78D5C1ED359BB46717D8C'
Metalink:
$ aria2c http://example.org/mylinux.metalink
Download URIs found in text file:
$ aria2c -i uris.txt
Wednesday, 21 September 2016
Loading Wikipedia in to ElasticSearch
http://blog.novelessay.com/post/loading-wikipedia-in-to-elasticsearch
This article gives instructions for loading Wikipedia articles in to ElasticSearch. I did this on Windows, but all of these steps should work on any java friendly platform.

This article gives instructions for loading Wikipedia articles in to ElasticSearch. I did this on Windows, but all of these steps should work on any java friendly platform.
- Download ElasticSearch
- Download stream2es
- Download Wikipedia articles
- Start ElasticSearch
- Run stream2es
Download ElasticSearch
Go to Elastic.co and download ElasticSearch here: https://www.elastic.co/downloads/elasticsearch
Download and unzip the elasticsearch download in to a folder of your choice.
Download stream2es
Go here and download the stream2es java jar file: http://download.elasticsearch.org/stream2es/stream2es
Optional: See stream2es on github for options: https://github.com/elastic/stream2es
Download Wikipedia articles
Go here and download the wikipedia article archive: https://dumps.wikimedia.org/enwiki/latest/
There are many options, but the specific one I downloaded was this: enwiki-latest-pages-articles.xml.bz2
(It's over 12GB, so be sure you have plenty of disk space.)
Start ElasticSearch
I'm on Windows, so I opened a command window and ran this:
c:\elasticsearch-1.5.2\bin\elasticsearch.bat
That starts up your local ElasticSearch instance at localhost:9200
Run stream2es
- Move the stream2es file to your ElasticSearch bin folder. I put stream2es here c:\elasticsearch-1.5.2\bin\
- Move the Wikipedia archive (enwiki-latest-pages-articles.xml.bz2) to your ElasticSearch bin folder too.
- Run the stream2es java file:
C:\elasticsearch-1.5.2\bin>java -jar stream2es wiki --target http://localhost:9200/mywiki --log debug --source /enwiki-latest-pages-articles.xml.bz2
Notes:
- You can change the "mywiki" to whatever you want your specific ElasticSearch index name to be.
- I had some trouble getting stream2es to find my wikipedia archive path on Windows, but the / in front of the file name worked.
I
ran this all local on my Windows desktop, and it took 6-8 hours. It
appears to be locked up near the end, but it did eventually exit.
Now, you should have over 16 million Wikipedia articles loaded in to your local ElasticSearch index. Enjoy.
Tuesday, 20 September 2016
Running TensorFlow on window 7
http://www.netinstructions.com/how-to-install-and-run-tensorflow-on-a-windows-pc/
If you're involved with machine learning, you probably
heard the news by now that Google open-sourced their machine learning
library TensorFlow a few weeks
ago. Excited to dive into TensorFlow, I went to their download and
installation page and was disappointed to discover they didn't offer any
support or instructions for Windows users.
But they did have a Docker image! In case you haven't heard, Docker is a container that wraps up a piece of software in a complete filesystem that contains everything it needs to run: code, runtime, system tools, and system libraries. And Docker is available on Windows.
(A quick aside -- As of June 2016 it looks like you can use Docker Toolbox for Windows for Windows Windows 7 or 8 and the newer, currently in beta Docker for Windows for Windows 10. Note the absence of the word 'Toolbox' if you are using Windows 10. Docker is confusing.
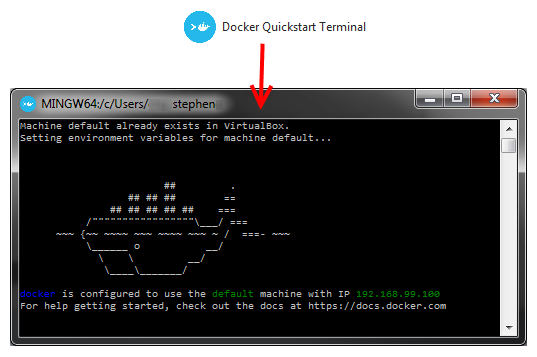
Then I opened up the Docker Quickstart Terminal.
It created a default Docker machine for me. You can view the Docker machines available by typing
You exit twice, first to get out of root access, and second to get out of the docker container.
Now if you type
Okay, now the Docker machine called 'vdocker' has been created and configured. Now to actually install TensorFlow. Open a Windows cmd prompt (not the Docker terminal) and enter the following:
FOR /f "tokens=*" %i IN ('docker-machine env --shell cmd vdocker') DO %i
You should see some output from the Docker machine like the following screenshot
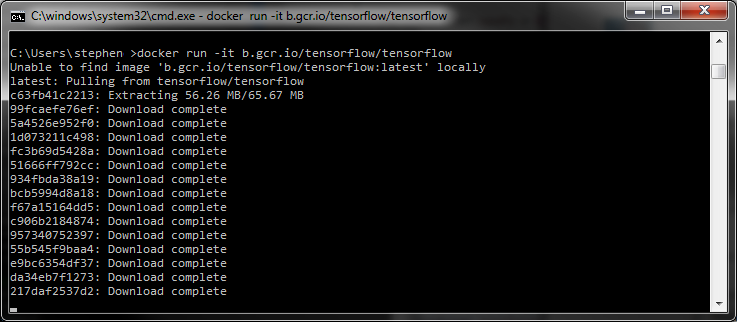
Then type the following line (from the Docker install page):
docker run -it -p 8888:8888 gcr.io/tensorflow/tensorflow
And it should start downloading the image which looks like
Because I was behind a corporate web proxy I initially got a
After it's done pulling the files and uncompressing them you should get a linux shell. Go ahead and type
*Technically you're running TensorFlow in a Docker container in a VirtualBox Linux virtual machine running in a Windows PC.
Here's the code from the above image:
Enjoy using TensorFlow on your Windows computer! If you had any Docker errors and/or are behind a web proxy see the notes here.
NOTE:
At the end, the docker tensorflow will run a Notebook that allow us to run ipython on browser.
Run docker-machine ls in the Docker Quick terminal to know the IP of the docker tensorflow
Then, from the host machine, can open Firefox and type that IP:8888
To stop vdocker:
docker-machine stop vdocker
And start it again:
In window cmd:
> docker-machine start vdocker
> FOR /f "tokens=*" %i IN ('docker-machine env --shell cmd vdocker') DO %i
> docker run -it -p 8888:8888 gcr.io/tensorflow/tensorflow
Then we can use [vdocker_IP]:8888 on the host browser :)
How to install and run TensorFlow on a Windows PC
But they did have a Docker image! In case you haven't heard, Docker is a container that wraps up a piece of software in a complete filesystem that contains everything it needs to run: code, runtime, system tools, and system libraries. And Docker is available on Windows.
How I was able to run TensorFlow on my Windows machine
First, I installed the Docker toolbox for Windows.(A quick aside -- As of June 2016 it looks like you can use Docker Toolbox for Windows for Windows Windows 7 or 8 and the newer, currently in beta Docker for Windows for Windows 10. Note the absence of the word 'Toolbox' if you are using Windows 10. Docker is confusing.
Then I opened up the Docker Quickstart Terminal.
It created a default Docker machine for me. You can view the Docker machines available by typing
docker-machine ls$ docker-machine ls
NAME ACTIVE DRIVER STATE URL SWARM
default * virtualbox Running tcp://192.168.99.100:2376
vdocker by typing:$ docker-machine create vdocker -d virtualbox
$ docker-machine ssh vdocker
sudo -s
echo "export HTTP_PROXY=http://proxyhost:8080" >> /var/lib/boot2docker/profile
echo "export HTTPS_PROXY=http://proxyhost:8080" >> /var/lib/boot2docker/profile
exit
exit
$ docker-machine restart vdocker
You exit twice, first to get out of root access, and second to get out of the docker container.
Now if you type
docker-machine ls you should see your two Docker machines NAME ACTIVE DRIVER STATE URL SWARM
default * virtualbox Running tcp://192.168.99.100:2376
vdocker - virtualbox Running tcp://192.168.99.101:2376
Okay, now the Docker machine called 'vdocker' has been created and configured. Now to actually install TensorFlow. Open a Windows cmd prompt (not the Docker terminal) and enter the following:
FOR /f "tokens=*" %i IN ('docker-machine env --shell cmd vdocker') DO %i
You should see some output from the Docker machine like the following screenshot
Then type the following line (from the Docker install page):
docker run -it -p 8888:8888 gcr.io/tensorflow/tensorflow
And it should start downloading the image which looks like
Because I was behind a corporate web proxy I initially got a
docker: An error occurred trying to connect: Post https://192.168.99.101:2376/v1.23/containers/create: Forbidden. which was was resolved by making a proxy exception using these steps.After it's done pulling the files and uncompressing them you should get a linux shell. Go ahead and type
python and try out TensorFlow on your Windows machine*!*Technically you're running TensorFlow in a Docker container in a VirtualBox Linux virtual machine running in a Windows PC.
Here's the code from the above image:
$ python
...
>>> import tensorflow as tf
>>> hello = tf.constant('Hello, TensorFlow!')
>>> sess = tf.Session()
>>> print sess.run(hello)
Hello, TensorFlow!
>>> a = tf.constant(10)
>>> b = tf.constant(32)
>>> print sess.run(a + b)
42
>>>
Enjoy using TensorFlow on your Windows computer! If you had any Docker errors and/or are behind a web proxy see the notes here.
NOTE:
At the end, the docker tensorflow will run a Notebook that allow us to run ipython on browser.
Run docker-machine ls in the Docker Quick terminal to know the IP of the docker tensorflow
Then, from the host machine, can open Firefox and type that IP:8888
To stop vdocker:
docker-machine stop vdocker
And start it again:
In window cmd:
> docker-machine start vdocker
> FOR /f "tokens=*" %i IN ('docker-machine env --shell cmd vdocker') DO %i
> docker run -it -p 8888:8888 gcr.io/tensorflow/tensorflow
Then we can use [vdocker_IP]:8888 on the host browser :)
Tuesday, 6 September 2016
Fix Anaconda Spyder kernel connection problem
Download and install Anaconda for Window:
https://www.continuum.io/downloads
When starting spyder the iPython console is unable to connect to kernel. The console displays:
'import sitecustomize' failed; use -v for traceback
Assertion failed: Socket operation on non-socket (bundled\zeromq\src\select.cpp:185)
https://www.continuum.io/downloads
When starting spyder the iPython console is unable to connect to kernel. The console displays:
'import sitecustomize' failed; use -v for traceback
Assertion failed: Socket operation on non-socket (bundled\zeromq\src\select.cpp:185)
Subscribe to:
Posts (Atom)
Do you see the same problem? ------ YES
this seems to be a problem with pyzmq. Do you know something about it?
and try again with
It works.